Developer Blog

by Roman Soldatow


  • Home

  • Tags

  • Archives

  • Projects

  • Impressum

Gnome and OpenVPN

Posted on 2020-07-05

In this short blog post, I would like to describe the problems and workarounds I did, to get OpenVPN working with the Gnome VPN Manager.

Normally I use the OpenVPN client for a VPN, but this time I decided (because I was using Gnome) to use the built-in VPN manager of Gnome. However, I encountered a few problems:

When you try to import the .opvn file, you get an error message saying “Error: the plugin does not support import capability”. Because Gnome Network Manager does not support OpenVPN out of the box.

  • You need to install the OpenVPN plugin for the network manager by:

    1
    sudo apt install network-manager-openvpn-gnome
  • After installation of the plugin, I still got the same error message. But I could import it over the shell with (replace the filename with yours):

    1
    sudo nmcli connection import type openvpn file <filename>
  • But the import was still not successful. It was failing on a line with “route”. The route remote_host 255.255.255.255 net_gateway default. That seems to be a common problem.

    I just commented it out with #. Like: # route remote_host 255.255.255.255 net_gateway

  • I could finally import the OpenVPN configuration. But I could not enable it. The slider went directly back to “off”.

    I could solve it by set the Password to Store the password for all users.

Pausing dunst while zoom screen sharing

Posted on 2020-05-08

I wrote a small script/blocklet to mute the dunst notifications while I’m sharing my screen over zoom. To prevent accidentally giving confidential information to other people e.g Slack or Mattermost messages.

I developed this as a blocklet for my i3wm (tiling window manager) status bar called i3blocks. It tries to find a specific window on your desktop, called “as_toolbar”, which represents that you share your screen.

If the window could be found, the dunst service will be paused and you will be notified over dunst that “Sharing mode” is activated. Upcoming dunst messages will be not removed so that by stop sharing your screen, all the messages will be shown.

It also shows a small bell and slashed bell icon (in my case) in the status bar. You can change it to any icon or text you like.
PS: Most likely the icon will shown as  in your editor

Zoom Dunst Blocklet

I named it “zoom.sh”

1
2
3
4
5
6
7
8
9
10
11
12
13
14
15
16
17
18
19
20
21
22
23
24
#!/bin/bash

DUNST_TIMEOUT=3 # duration in seconds
DUNST_URGENCY=low # low, normal or critical

xwininfo -name as_toolbar >/dev/null 2>&1
if [ $? -eq 0 ]; then
if ! [ -f "/tmp/i3zoom.lock" ]; then
touch /tmp/i3zoom.lock
notify-send -u ${DUNST_URGENCY} -t ${DUNST_TIMEOUT}000 Zoom "Sharing mode activated"
sleep ${DUNST_TIMEOUT}
notify-send DUNST_COMMAND_PAUSE
echo "<span foreground=\"#FF0000\"></span>"
else
echo "<span foreground=\"#FF0000\"></span>"
fi

else
if [ -f "/tmp/i3zoom.lock" ]; then
rm /tmp/i3zoom.lock
notify-send DUNST_COMMAND_RESUME
fi
echo "<span foreground=\"#00FF00\"></span>"
fi

Integration in i3blocks config

1
2
3
4
[zoom]
command=$HOME/.config/i3blocks/blocks/zoom.sh
interval=5
markup=pango

Virtual webcam with v4l2

Posted on 2020-04-25

A few weeks ago I discovered Video4Linux (v4l2), which allows you to control video devices like a webcam.

In my case, I simulated/virtualized a webcam. That means that with the help of v4l2 I could send a video stream (or an image) to a virtual/simulated webcam. And every app that can normally address a webcam (e.g. Zoom or Skype) played my video what I sent to the webcam.

Here are some of the commands I found useful.

Setup

With v4l2loopback we can virtualize a webcam.

1
sudo apt install v4l2loopback-dkms

With v4l2-ctl we can control the video4linux drivers. (It is in the v4l-utils package)

1
sudo apt install v4l-utils

With ffmpeg we can stream our video to the webcam

1
sudo apt install ffmpeg

Start

Let’s load the kernel module v4l2loopback, which creates a virtual video device.

1
sudo modprobe v4l2loopback

If you need multiple video devices, you can load them as follow

1
sudo modprobe v4l2loopback devices=2

The video devices will appear under /dev/video[0-9].
You can check with v4l2-ctl, which id your video devices have

1
v4l2-ctl --list-devices

Video to webcam

You can stream a video (input.mov in that case) to your virtualized webcam

1
ffmpeg -re -i input.mov -f v4l2 /dev/video0

Loop

If you would like to send your video in a loop

1
ffmpeg -stream_loop -1 -re -i input.mov -f v4l2 /dev/video0

Picture to webcam

If you would like just send a picture to your virtualized webcam.

1
ffmpeg -loop 1 -re -i input.jpg -f v4l2 -vcodec rawvideo -pix_fmt yuv420p /dev/video0

Desktop to webcam

If you would like to stream your desktop. Very handy if the application you use doesn’t support screen sharing.

1
ffmpeg -f x11grab -framerate 25 -video_size 1920x1080 -i :1 -f v4l2 /dev/video0

In my case the input is “:1”, this could be different e.g :0.
You can identify your display by echo $DISPLAY

You can identify your resolution with resolution: xrandr -q

If you have multiple screens, you can just add the resolution you have to the display e.g. :1+1920

Cloning a webcam

You can clone e.g. your real webcam (/dev/video0) to multiple devices. In that case /dev/video1 and /dev/video2

That is handy if an application is blocking a device (because it will be used), you can bypass it by cloning the webcam and use it in another application the cloned video device.

1
ffmpeg -f v4l2 -i /dev/video0 -f v4l2 /dev/video1 -f v4l2 /dev/video2

video1 and video2 need to be created. E.g. sudo modprobe v4l2loopback devices=2

Useful commands

Playing the webcam stream

ffplay is a simple media player, which use the FFmpeg library

1
ffplay /dev/video0

If the stream you playing is a bit laggy (that was in my case) you can tune it with:

1
ffplay /dev/video0  -fflags nobuffer -flags low_delay -framedrop

mpv is a free (as in freedom) media player for the command line.

1
mpv /dev/video0

Coronavirus impact on internet traffic

Posted on 2020-03-24

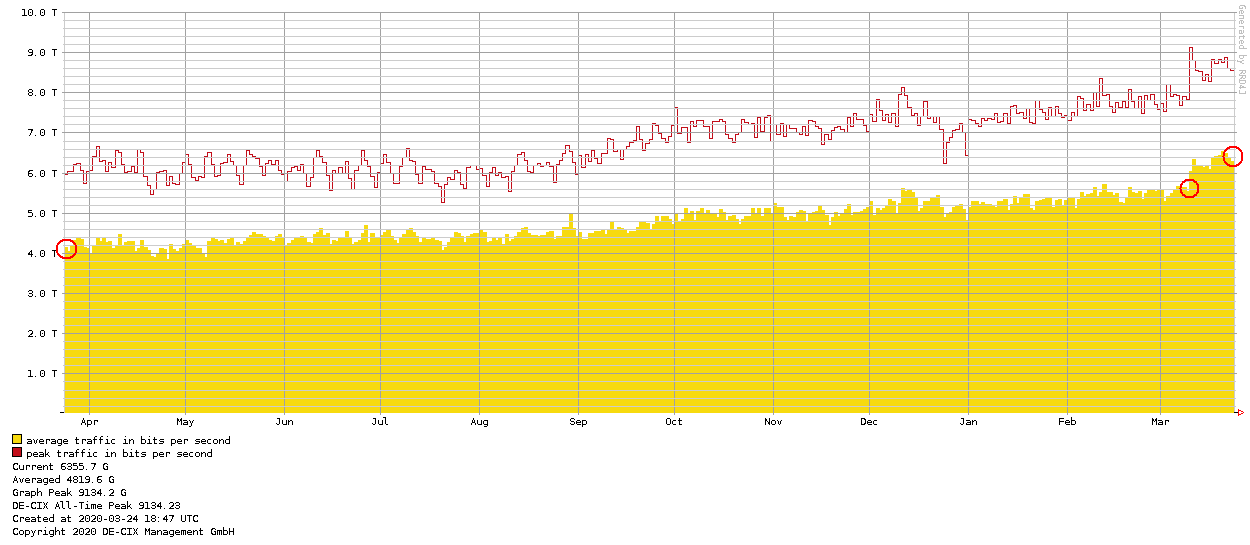
I was wondering which effect the coronavirus has on Internet traffic. As we all know, many people now work more in home office and people consume more streaming (e.g. YouTube, Netflix etc.) and gaming services (e.g. Steam or Google Stadia).

For this purpose, I looked at the statistics from DE-CIX in Frankfurt, which is the second largest exchange point worldwide in terms of peak traffic (source: Wikipedia).

So, let’s check the 1-year graph

  • Starting with the march 24th 2019 we had averaged traffic around 4200~ gigabits
  • At the 14 march 2020 we had around 5600~ gigabits (second mark)
  • At the 24 march 2020 we had around 6400~ gigabits (third mark)

If we look at the growth from the starting point till the 14 march 2020 (almost a whole year), we see a growth by around 1400~ gigabits (in DE-CIX Frankfurt).

And if we compare between 14 march 2020 and 24 march 2020, we see a growth around 1200~ gigabits.

That means, that in about 10 days (in reality even less) the internet average grew almost as it normally does in a whole year.

OpenVPN bypass

Posted on 2020-03-19

In the time of coronavirus pandemic, many companies rely on home office. While working in the home office, the entire data traffic is transferred via the VPN server. So you can use the internal services/tools but also online services like Google, Spotify, Youtube or Zoom.

This means a hard time for the VPN servers, which have to transfer the entire traffic from your PC to the internal tools, online services and back to your PC.

In order not to overload the VPN servers, you don’t want to transfer data intensive services like Youtube over the VPN. Also, you don’t want to send data flow sensitive services like audio/video communication tools over the VPN (unless you want the additional encryption).
One solution to this could be an route exception for such services. So that the services will bypass the VPN and will be directly routed to the internet.

OpenVPN bypass

If your are using OpenVPN, you can easily add routes to bypass VPN for a specific domain.
Just open your openvpn client config (.opvn or .conf filetype) and add your bypass/route you like.

E.g.: just add follow lines after the line:
route remote_host 255.255.255.255 net_gateway

My VPN routes

1
2
3
4
route youtube.com 255.255.255.255 net_gateway     # For youtube
route googlevideo.com 255.255.255.255 net_gateway # For youtube as well (videos itself)
route akamaized.net 255.255.255.255 net_gateway # Spotify and other services hosted/distributed over akamai
route zoom.us 255.255.255.255 net_gateway # For Zoom Conferences

OpenVPN client username / password

Another handy OpenVPN client config is “auth-user-pass”, which allows you to save username and password for the VPN. So that you don’t need to input your username/password every time you enable the VPN (E.g. if you have VPN in autostart).

Just add follow line to the config

1
auth-user-pass pass.txt

And create a file named “pass.txt” next to the OpenVPN config file. The content of the pass.txt file is just:

1
2
yourusername
yourpassword
123…6

Roman Soldatow

Developer Blog over coding and embedded systems (DIY) projects, and also some tips and tricks around the IT world.
30 posts
16 tags
RSS
GitHub StackOverflow
© 2022 Roman Soldatow